Tomato Soup with Grilled Cheese Croutons

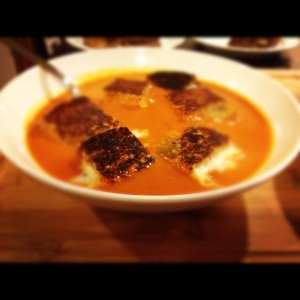
Ok I must confess, this isn’t really a recipe per-say, but I thought it would be fun to share regardless. I had a request last weekend for grilled cheese and tomato soup for dinner… I thought about getting creative with the sandwich (adding meat, veggies, fancy cheese etc.) but then remembered a pin I had seen on Pinterest referencing “Grilled Cheese Croutons” and thought I’d give it a go. It certainly made the soup more interesting for sure.

To make the croutons, just make your grilled cheese the way you normally would, and cut it up into bite size pieces and plop them into the soup (I used Trader Joes roasted red pepper/tomato soup). I just used regular sandwich bread and got 12 croutons out of each sandwich. The best part is that the cheese oozes out into the soup… just sayin’.

Grilled Cheese Croutons


Philly Cheesesteak Peppers

Not much to say about this recipe. Found it on pinterest, looked quick and easy so I decided to give it a try. I LOVE philly cheesesteaks, but have been trying to be a bit more conscious about what I’m eating these days. This looked like a good compromise as it totally eliminates carbs.

Philly Cheesesteak Peppers (Serves 2, serving size 2 pepper halves) Adapted from Peace Love and Low Carb

Ingredients:

2 large green bell peppers
1/2 pound deli sliced roast beef
1 medium onion, sliced into rings
2 cups sliced mushrooms
4 thin slices provalone cheese
salt
pepper
olive oil

Directions:

1. Cut each pepper in half. Remove seeds and white skin (It’s a good idea to blanch the peppers in boiling water for a 2-3 minutes prior to cooking)
2. Pre-heat oven t0 400 degrees
3. Slice meat into thin strips
4. Heat a large skillet over medium high heat. Add about 1 Tbs. olive oil
5. Add onions to skillet. Lower heat to medium and saute (stirring frequently) for about 4 minutes. Add the mushrooms and saute until onions are translucent and mushrooms have shrank up a bit
6. Add meat to the skillet and season with salt and pepper. Cook for 3-4 minutes
7. Place peppers, cut sides up on a baking sheet lined with foil. Press one slice of cheese into the bottom of the pepper. Fill each pepper with enoufh of the meat mixture to completely fill the pepper. Top with the other slice of cheese
8. Bake peppers for 20 minutes. Make sure to keep an eye on them as the cheese tends to brown
9. Remove and cool for 5 minutes before eating

*Notes for next time: I would add some sweet and hot peppers into the meat mixture. Also, I would blanch the peppers first, they didn’t get cooked all the way through in 2o minutes.

Orange Chicken

I’ll spare you the “it’s been awhile and here’s my excuse as to why”… safe to say I still need to work on a normal routine! Anyway on to the topic at hand, Orange Chicken. Orange Chicken is by far my favorite item on a Chinese food menu and in a pinch I will definitely grab a bag of frozen Orange Chicken at Trader Joe’s (not ashamed to admit this). I found a recipe on a blog called Tracey’s Culinary Adventures, and it looked like she adapted her recipe from Cooks Illustrated. My recipe is an adaptation of her recipe. This recipe takes a bit of time to create, I would allow almost an hour to hour and a half to cook from start to finish. It’s definitely healthier than ordering out, but unfortunately is a lot more time-consuming.

Orange Chicken (adapted from Cook’s Illustrated/Tracey’s Culinary Adventures)

Ingredients:

Marinade/Sauce

1 1/2-2 pounds chicken breast, cut into 1 1/2-inch pieces
3/4 cup low-sodium chicken stock
3/4 cup freshly squeezed orange juice (about 2 large oranges)
2 teaspoons grated zest
6 tablespoons white vinegar
1/4 cup soy sauce
1/2 cup packed dark brown sugar
3 medium garlic cloves, minced
1 inch piece fresh ginger, minced
1/4 teaspoon cayenne pepper
1 tablespoon cornstarch, plus 2 teaspoons
2 tablespoons cold water

For Coating
3 large egg whites
1/2 cup cornstarch
1/2 cup all-purpose flour
1/2 cup canola oil

Directions:

1. In a large saucepan combine the chicken stock, orange juice, orange zest, vinegar, soy sauce, brown sugar, garlic, ginger and cayenne pepper.  Whisk thoroughly
2. Transfer 3/4 cup of the mixture to a gallon-sized resealable plastic bag.  Add the chicken to the bag then seal and refrigerate for no longer than 30 minutes
3. Heat the remaining sauce in the pan over medium-high heat until it comes to a boil
4. Combine the cornstarch and water in a small bowl, mixing to dissolve the cornstarch
5. Once the sauce reaches a boil, whisk in the cornstarch mixture
6. Simmer the sauce until thick and translucent, about 1 minute.  Remove from the heat and set aside while you make the chicken
7. Preheat oven to 500 F.
8. In a shallow bowl add the egg whites and beat with a fork until they’re frothy and broken up
9. In a second shallow bowl,  combine the cornstarch and flour
10. Remove the chicken from the refrigerator and drain to remove the marinade. Pat the chicken dry with paper towels
11. Add the chicken to the egg whites, turning to coat on all sides
12. Place the chicken in the cornstarch/flour mixture and toss to coat.  Shake off the excess and place the chicken on a plate
13. Repeat with all of the chicken pieces
14. Place a rimmed baking sheet in the preheated oven for 5 minutes
15. Remove the sheet, add the oil and return to the oven until the oil just starts smoking
16. Remove the baking sheet and add the chicken pieces in a single layer.  Cook for 7 minutes
17. Flip each piece of chicken over and cook on the other side until browned and cooked through, about 3-5 minutes
18. Transfer the chicken to a paper towel-lined plate to drain excess oil
19. Reheat the sauce and add the chicken, stirring to coat
20. Serve with white rice, and a garnish of green onion if you wish

Chipotle Orange Chicken

If you haven’t heard of the Homesick Texan, I urge you to go check her blog out. (She’s totally famous and really doesn’t need an extra endorsement but still). It’s beyond tacos, burritos and your typical tex mex. She has all sorts of recipes ranging from Mexican to barbecue and a few unique inbetweeners. When I was browsing through her blog the other week I came across this recipe for chipotle-orange glazed drumsticks. This recipe was very easy to make, and great for a large group of people. The sauce recipe makes more than enough to both coat the chicken and have extra on the side. I’ve made this recipe twice in the past week and a half, and it was a total hit both times.

Chipotle Orange Chicken Pieces (adapted from The Homesick Texan)

Ingredients:
6 drumsticks
6 thighs
Salt, to taste
Black pepper, to taste
1 1/2 cups fresh-squeezed orange juice
1 1/2 chipotle chiles en adobo
3 cloves garlic, chopped
3/4 cups ketchup
1 tablespoon molasses
2 tablespoons white vinegar
2 tablespoons Worcestershire sauce
Pinch of ground allspice
1 teaspoon orange zest

Directions:
1. Preheat the oven to 450 degrees. Line a rimmed baking sheet with parchment paper. Sprinkle the chicken pieces with salt and pepper, place on the sheet and bake for 40 minutes.

2. While the chicken is in the oven, in a food processor mix together the orange juice, chipotle chile and garlic.

3. Pour into a large saucepot and stir in the ketchup, molasses, vinegar, Worcestershire sauce and allspice. Bring to a boil (it will likely splatter a bit), turn the heat down to medium-low and while stirring occasionally.

4. Cook for 35-40 minutes or until thickened. Adjust seasonings and add salt to taste.

5. Once the chicken pieces are done, remove from the oven and turn on the broiler. Add the chicken to the saucepot and toss with the chipotle orange sauce.

6. Replace the parchment paper on the baking sheet and place chicken pieces back on the sheet. Cook under the broiler for 1-2 minutes or until darkened and brown spots appear.

7. Cool and serve!

Cauliflower Pizza Crust

Hello blog world! It’s been a bit. I recently started a new job and well, just haven’t had time to write between that and the millions of weddings I’ve been attending this summer 🙂 I’m working on a back-log of recipes and hope to start-up a regular posting schedule again soon. Now onto the good stuff!

I feel like I’m a little late to the cauliflower pizza crust game. It’s been plastered all over pinterest and other low-carb food blogs and I wanted to give it a try. I was really surprised at how good it was. Certainly, it is nowhere near the same as having a greasy, delicious and doughy crust, but if you are watching your carbs, it’s certainly a good option. Give it a try, and let me know what you think!

Cauliflower Crust Pizza (makes roughly one 10-12 inch crust)

Ingredients:

1 cup cooked, riced* cauliflower
1/4-1/2 cup shredded mozzarella (I honestly felt overwhelmed by the amount of cheese in the crust and as a topping, so go sparingly on either the topping or the crust)
1 egg, beaten
1 tsp Italian seasoning
1 tsp minced garlic
1/2 tsp salt
Olive oil (optional)

Pizza sauce
Mozzarella cheese, shredded
Toppings of your choice

Directions:

1. Place the riced cauliflower in a microwave safe bowl, add 1/4 cup water, and microwave for 6-8 minutes, stirring half-way through. (I forgot to do this step and it still turned out fine. I ended up having to heat up the riced cauliflower with the cheese in it… don’t ask 😉 )

2. Preheat the oven to 450 degrees F. Place a piece of parchment paper on a cookie sheet.

3. In a medium bowl, combine the cauliflower, mozzarella cheese and egg together. Add the oregano, garlic, and salt. Transfer to the cookie sheet, and shape into a 10-inch circle. Brush the crust with olive oil to help it brown in the oven

4. Baked for 15 minutes, until the crust is browned and cooked through the middle

5. Remove the crust from the oven, add your sauce and toppings. (I used sausage and made sure to pre-cook it so it would be warm.) Place under a broiler at high heat for 3-4 minutes (or until cheese is bubbly)

6. Remove, cool, slice and serve. You’ll probably need a fork and knife for this one!

*To rice your cauliflower, take 1/2 large head of cauliflower, remove the stems and leaves, and chop the florets into chunks. Add to a food processor and pulse just until it looks like rice/quinoa.

Prosciutto Wrapped Chicken Thighs

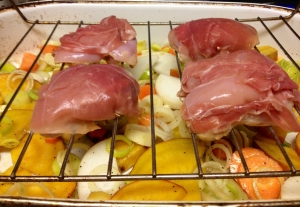
Chicken thighs tend to get a bad rep, especially when it comes to dieting. While being pretty strict on Weight Watchers, I was pretty wary of eating them… chicken breasts are always the go to “diet chicken” but it turns out when you use the boneless/skinless variety and trim the extra fat, they aren’t that bad for you. Adding a thin slice of prosciutto gives the chicken much more flavor and crunch without adding a ton of fat (for me it was just as good as cooking the chicken with skin on.) I served the chicken with a mix of roasted vegetables and brown rice.

Prosciutto Wrapped Chicken Thighs (Serves 2, WW points+ 7 points for 2 thighs)

Ingredients:
4 boneless skinless chicken thighs
1 oz. thinly sliced prosciutto

Directions:
1. Preheat oven to 375
2. Trim the excess fat from your chicken
3. Using tooth picks, secure 1.5 slices prosciutto to the chicken

4. Place in a roasting pan (I put mine on a roasting rack over my veggies)

5. Cook about 25 minutes or until the juices run clear when pierced with a knife
6. Serve with roasted vegetables and brown rice for a complete meal

Lemon Raspberry Thumbprint Cookies

When I was younger I used to adore the Pepperidge Farm raspberry filled cookies. The buttery cookie was a perfect setting for the sweet and sticky raspberry filling. A few years ago while searching for good Christmas cookie recipes, I stumbled upon a raspberry lemon thumbprint cookie recipe ala Emeril Lagasse. After the first time making them, I set about making a few changes the next go around. I still make these every Christmas, as my dad loves them, but they are a great cookie to make for an outdoor occasion or a big summer bbq/potluck. One recipe makes almost 4 dozen cookies (if you are good about rolling your dough into exactly 1 in balls, which I am not) so there is always plenty to go around. If you are making these ahead, make sure to store in an airtight container with a piece of parchment between each layer of cookies, these guys are sticky!

Lemon Raspberry Thumbprint Cookies (adapted from Emeril Lagasse, makes around 4 dozen cookies)
 

Ingredients:
3/4 cup raspberry jam
1 1/4 tablespoon Grand Marnier
2 1/4 cups all-purpose flour
1 teaspoon baking powder
1/4 teaspoon salt
2 sticks butter, room temperature
2/3 cup sugar
2 large egg yolks
1 tablespoon finely grated lemon zest
1 teaspoon vanilla extract

Directions:
1. Preheat the oven to 350 degrees F. Line 2 baking sheets with parchment paper
2. In a small bowl, combine the jam and Grand Marnier and combine
3. In a medium bowl, combine the flour, baking powder, and salt and whisk together
4. In a large bowl using an electric mixer, beat the butter and sugar until light and creamy then beat in the egg yolks, lemon zest, and vanilla
5. Add the flour mixture in 2 additions and beat just until moist clumps form, then gather the dough together into a ball
6. Pinch off the dough to form 1-inch balls. Place on the prepared baking sheets, spacing 1-inch apart

7. Use your floured index finger or a small spoon to create depressions in the center of each ball

8. Fill each depression with roughly 1/2 teaspoon of the jam mixture

9. Bake until golden brown, about 20 minutes
10. Transfer the cookies to wire racks to cool


A Little Pie for the Pie Party

On Facebook today, a few folks have put together an internet wide Pie Party. Everyone is invited to take part, and take part they are. Go check it out, there are some crazy beautiful pies people are making and posting today that are simply mouth watering. My contribution to this Pie Party is a blackberry/raspberry mini pie in a cast iron pan. I’ve made one before and posted it on here, but the pictures were very sub par. I have a much better one this time around. Making pies in cast iron is a fun and different way to serve it, and makes it look that much more rustic.

Topless Blackberry/Raspberry Mini Pie in a Cast Iron

Crust:

1 cup plus 2 T. flour
1/4 teaspoon salt
1/3 cup vegetable shortening
2-3 T. cold water

1. Mix the flour and salt together in a bowl, add the shortening, and work it into the flour with a pastry blender, two knives, or your fingertips until the mixture resembles fresh bread crumbs
2. Sprinkle on the water, a tablespoon at a time, stirring lightly with a fork after each addition
3. Use enough water so that the dough holds together and comes off the sides of the bowl, but not so much that it is sticky
4. Pull dough into a ball and gently roll out
5. Place pie crust into cast iron skillet (make sure your skillet is well seasoned, when in doubt, give it a quick spray with olive oil)
6. Preheat oven to 400 degrees

Filling:

1 1/2 cups blackberries
1 1/2 cups raspberries
1/4 cup white sugar
3 Tbs. cornstarch

1. Combine all ingredients in a medium bowl
2. Spoon mixture into prepared cast iron skillet
3. Bake at 400 degrees for ten minutes. Lower heat to 350 and bake an additional 15-20 minutes or until the filling is bubbly
4. Cool for at least 30 minutes (and hour if you can handle waiting) so the filling can firm up


Guacamole

There is no single better dip in the world (in my humble opinion) than homemade guacamole. I could probably sit down and finish off an entire bowl to myself! As I said, perfect for a dip, a topping for burgers or a topping for a tostada.

Guacamole

Ingredients:
3 large, ripe avocados
2 Tbs. white onion, minced
1-2 jalapenos, minced (you can remove the membranes and seeds if you don’t like it spicy)
3 Tbs. finely chopped cilantro
juice of half a lime
salt

Directions:
1. Cut, peel and pit the avocados, and place into a small bowl.  (Good tutorial here)
2. Mash avocado with a fork, leaving a few larger chunks
3. Add the onion, jalapenos, cilantro and lime juice. Stir to combine
4. Salt to taste

Mini Cinnamon Sugar Popovers

This weekend was actually a bit of a lazy weekend, the last one I think I’ll have for awhile. So naturally, I used some of this downtime to bake.  I had been meaning to try popovers forever, but didn’t really want to go out and buy a special pan. Luckily, I stumbled upon a recipe on Pinterest that did not require a special popover pan and I was all set. These little guys are really easy to make, and if you are craving something buttery, chewy and sweet this is the recipe for you! I can’t wait to try this base recipe with something more savory… a goat cheese perhaps? Do you have a favorite popover?

Mini Cinnamon Sugar Popovers (makes 30 mini popovers, adapted from http://www.howsweeteats.com)

 Ingredients:

1 cup all-purpose flour
1/3 cup granulated sugar
1 teaspoon cinnamon
1/4 teaspoon salt
1 1/4 cups milk, at room temperature
2 large eggs, at room temperature
4 tablespoon butter, melted
1/4 cup granulated sugar + 1 teaspoon cinnamon mixed for the tin and dusting

Directions:

1. Pre-heat your oven to 450 degrees and place the oven rack in the lower 1/3 of the oven
2. Brush a mini-cupcake tin with butter and dust each tin with the cinnamon/sugar mix (don’t skip the buttering even if you are using a non stick pan, the butter and cinnamon/sugar caramelize on the bottom of the tin)


3. In a large bowl, whisk together flour, sugar, salt and cinnamon until no lumps remain
4. In a large measuring cup (I used my 2 cup pyrex) mix milk, eggs, and 2 tablespoons butter, and stir into dry ingredients until just combined. (Note that a few lumps may remain, but do not stir until smooth)
5. Pour batter into mini muffin tins within 1/4 inch of the rim. Sprinkle more cinnamon sugar on top

6. Bake for 10 minutes. Don’t be tempted to open the oven, the popovers will fall
7. After 10 minutes, reduce the heat to 350 degrees F and bake until golden brown and puffy – about 7 minutes

8. Remove from oven and let cool. Brush with the remaining melted butter, then cover in more cinnamon sugar and serve immediately!