Orange Chicken

I’ll spare you the “it’s been awhile and here’s my excuse as to why”… safe to say I still need to work on a normal routine! Anyway on to the topic at hand, Orange Chicken. Orange Chicken is by far my favorite item on a Chinese food menu and in a pinch I will definitely grab a bag of frozen Orange Chicken at Trader Joe’s (not ashamed to admit this). I found a recipe on a blog called Tracey’s Culinary Adventures, and it looked like she adapted her recipe from Cooks Illustrated. My recipe is an adaptation of her recipe. This recipe takes a bit of time to create, I would allow almost an hour to hour and a half to cook from start to finish. It’s definitely healthier than ordering out, but unfortunately is a lot more time-consuming.

Orange Chicken (adapted from Cook’s Illustrated/Tracey’s Culinary Adventures)

Ingredients:

Marinade/Sauce

1 1/2-2 pounds chicken breast, cut into 1 1/2-inch pieces
3/4 cup low-sodium chicken stock
3/4 cup freshly squeezed orange juice (about 2 large oranges)
2 teaspoons grated zest
6 tablespoons white vinegar
1/4 cup soy sauce
1/2 cup packed dark brown sugar
3 medium garlic cloves, minced
1 inch piece fresh ginger, minced
1/4 teaspoon cayenne pepper
1 tablespoon cornstarch, plus 2 teaspoons
2 tablespoons cold water

For Coating
3 large egg whites
1/2 cup cornstarch
1/2 cup all-purpose flour
1/2 cup canola oil

Directions:

1. In a large saucepan combine the chicken stock, orange juice, orange zest, vinegar, soy sauce, brown sugar, garlic, ginger and cayenne pepper.  Whisk thoroughly
2. Transfer 3/4 cup of the mixture to a gallon-sized resealable plastic bag.  Add the chicken to the bag then seal and refrigerate for no longer than 30 minutes
3. Heat the remaining sauce in the pan over medium-high heat until it comes to a boil
4. Combine the cornstarch and water in a small bowl, mixing to dissolve the cornstarch
5. Once the sauce reaches a boil, whisk in the cornstarch mixture
6. Simmer the sauce until thick and translucent, about 1 minute.  Remove from the heat and set aside while you make the chicken
7. Preheat oven to 500 F.
8. In a shallow bowl add the egg whites and beat with a fork until they’re frothy and broken up
9. In a second shallow bowl,  combine the cornstarch and flour
10. Remove the chicken from the refrigerator and drain to remove the marinade. Pat the chicken dry with paper towels
11. Add the chicken to the egg whites, turning to coat on all sides
12. Place the chicken in the cornstarch/flour mixture and toss to coat.  Shake off the excess and place the chicken on a plate
13. Repeat with all of the chicken pieces
14. Place a rimmed baking sheet in the preheated oven for 5 minutes
15. Remove the sheet, add the oil and return to the oven until the oil just starts smoking
16. Remove the baking sheet and add the chicken pieces in a single layer.  Cook for 7 minutes
17. Flip each piece of chicken over and cook on the other side until browned and cooked through, about 3-5 minutes
18. Transfer the chicken to a paper towel-lined plate to drain excess oil
19. Reheat the sauce and add the chicken, stirring to coat
20. Serve with white rice, and a garnish of green onion if you wish

Chipotle Orange Chicken

If you haven’t heard of the Homesick Texan, I urge you to go check her blog out. (She’s totally famous and really doesn’t need an extra endorsement but still). It’s beyond tacos, burritos and your typical tex mex. She has all sorts of recipes ranging from Mexican to barbecue and a few unique inbetweeners. When I was browsing through her blog the other week I came across this recipe for chipotle-orange glazed drumsticks. This recipe was very easy to make, and great for a large group of people. The sauce recipe makes more than enough to both coat the chicken and have extra on the side. I’ve made this recipe twice in the past week and a half, and it was a total hit both times.

Chipotle Orange Chicken Pieces (adapted from The Homesick Texan)

Ingredients:
6 drumsticks
6 thighs
Salt, to taste
Black pepper, to taste
1 1/2 cups fresh-squeezed orange juice
1 1/2 chipotle chiles en adobo
3 cloves garlic, chopped
3/4 cups ketchup
1 tablespoon molasses
2 tablespoons white vinegar
2 tablespoons Worcestershire sauce
Pinch of ground allspice
1 teaspoon orange zest

Directions:
1. Preheat the oven to 450 degrees. Line a rimmed baking sheet with parchment paper. Sprinkle the chicken pieces with salt and pepper, place on the sheet and bake for 40 minutes.

2. While the chicken is in the oven, in a food processor mix together the orange juice, chipotle chile and garlic.

3. Pour into a large saucepot and stir in the ketchup, molasses, vinegar, Worcestershire sauce and allspice. Bring to a boil (it will likely splatter a bit), turn the heat down to medium-low and while stirring occasionally.

4. Cook for 35-40 minutes or until thickened. Adjust seasonings and add salt to taste.

5. Once the chicken pieces are done, remove from the oven and turn on the broiler. Add the chicken to the saucepot and toss with the chipotle orange sauce.

6. Replace the parchment paper on the baking sheet and place chicken pieces back on the sheet. Cook under the broiler for 1-2 minutes or until darkened and brown spots appear.

7. Cool and serve!

Cauliflower Pizza Crust

Hello blog world! It’s been a bit. I recently started a new job and well, just haven’t had time to write between that and the millions of weddings I’ve been attending this summer 🙂 I’m working on a back-log of recipes and hope to start-up a regular posting schedule again soon. Now onto the good stuff!

I feel like I’m a little late to the cauliflower pizza crust game. It’s been plastered all over pinterest and other low-carb food blogs and I wanted to give it a try. I was really surprised at how good it was. Certainly, it is nowhere near the same as having a greasy, delicious and doughy crust, but if you are watching your carbs, it’s certainly a good option. Give it a try, and let me know what you think!

Cauliflower Crust Pizza (makes roughly one 10-12 inch crust)

Ingredients:

1 cup cooked, riced* cauliflower
1/4-1/2 cup shredded mozzarella (I honestly felt overwhelmed by the amount of cheese in the crust and as a topping, so go sparingly on either the topping or the crust)
1 egg, beaten
1 tsp Italian seasoning
1 tsp minced garlic
1/2 tsp salt
Olive oil (optional)

Pizza sauce
Mozzarella cheese, shredded
Toppings of your choice

Directions:

1. Place the riced cauliflower in a microwave safe bowl, add 1/4 cup water, and microwave for 6-8 minutes, stirring half-way through. (I forgot to do this step and it still turned out fine. I ended up having to heat up the riced cauliflower with the cheese in it… don’t ask 😉 )

2. Preheat the oven to 450 degrees F. Place a piece of parchment paper on a cookie sheet.

3. In a medium bowl, combine the cauliflower, mozzarella cheese and egg together. Add the oregano, garlic, and salt. Transfer to the cookie sheet, and shape into a 10-inch circle. Brush the crust with olive oil to help it brown in the oven

4. Baked for 15 minutes, until the crust is browned and cooked through the middle

5. Remove the crust from the oven, add your sauce and toppings. (I used sausage and made sure to pre-cook it so it would be warm.) Place under a broiler at high heat for 3-4 minutes (or until cheese is bubbly)

6. Remove, cool, slice and serve. You’ll probably need a fork and knife for this one!

*To rice your cauliflower, take 1/2 large head of cauliflower, remove the stems and leaves, and chop the florets into chunks. Add to a food processor and pulse just until it looks like rice/quinoa.

Prosciutto Wrapped Chicken Thighs

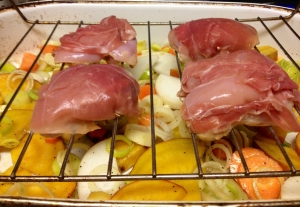
Chicken thighs tend to get a bad rep, especially when it comes to dieting. While being pretty strict on Weight Watchers, I was pretty wary of eating them… chicken breasts are always the go to “diet chicken” but it turns out when you use the boneless/skinless variety and trim the extra fat, they aren’t that bad for you. Adding a thin slice of prosciutto gives the chicken much more flavor and crunch without adding a ton of fat (for me it was just as good as cooking the chicken with skin on.) I served the chicken with a mix of roasted vegetables and brown rice.

Prosciutto Wrapped Chicken Thighs (Serves 2, WW points+ 7 points for 2 thighs)

Ingredients:
4 boneless skinless chicken thighs
1 oz. thinly sliced prosciutto

Directions:
1. Preheat oven to 375
2. Trim the excess fat from your chicken
3. Using tooth picks, secure 1.5 slices prosciutto to the chicken

4. Place in a roasting pan (I put mine on a roasting rack over my veggies)

5. Cook about 25 minutes or until the juices run clear when pierced with a knife
6. Serve with roasted vegetables and brown rice for a complete meal

Panzanella

Panzanella is essentially just salad minus the lettuce with the addition of bread cubes. I made this one last night as I was running out of time to use an old loaf of bread and didn’t want it to go bad. Panzanella is fully customizable and is great for a side dish or a lighter main dish. You can add a protien as well, making it heartier.

Quick Balsamic Panzanella (serves 1)

Ingredients:
1 1/2 inch slice of ciabatta bread
4oz shredded chicken
Half pint of cherry tomatoes
1/3 cup diced cucumber
1/4 cup thickly sliced onion
1 garlic clove, cut in half
Olive oil
Balsamic Vinegar
Salt/Pepper

Directions:
1. Pre-heat oven to 400 degrees
2. Half tomatoes and combine them, the chicken, cucumber and onion in a small bowl
3. Oil each side of the bread. Place in oven and brown on each side
4. Let the bread cool, then rub each side with the garlic clove
5. Slice the bread into 1/2 inch cubes and add to the vegetable/chicken mix
6. Drizzle oil and vinegar over the salad (to your specifications). Toss with salt and pepper to taste

Bubble Up Enchiladas

I know a lot of you have seen this recipe floating around the web and it has been sitting on my “recipes to try” Pinterest board for far too long. Shockingly enough, it is originally a weight watchers recipe, all though I pretty much stripped it of being one. I took the basic recipe and added quite a few things to it, which is the best part about it! You can change/add/detract any of the ingredients or keep it basic and it will still taste amazing. This meal took about 15 minutes to prepare, which makes it a great addition to your weeknight recipe arsenal.

Bubble Up Enchiladas (Serves 6)

Ingredients
1 1/4 lb lean ground turkey
1 can black beans, rinsed and drained
1 19 oz can red enchilada sauce
1 7.5 oz can reduced fat refrigerator biscuits, ripped into small pieces
1/2 cup frozen corn
1/2 cup diced red bell peppers
1/2 cup diced white onion
one packet taco seasoning
1 Tbs. olive oil
1-2 cups reduced fat shredded mexican blend cheese
1/4 diced green onion (optional)
avocado (for garnish)
sour cream (for garnish)

Directions:
1. Pre-heat oven to 350 degrees
2. In a large cast iron skillet*, heat the olive oil over medium-high heat
3. Brown the meat and add the taco seasoning while browning
4. Add the beans, veggies and enchilada sauce to the skillet
5. Tear the biscuits into small pieces and cut into the enchilada mixture in your skillet
6. Place the skillet in the oven for 30 minutes
7. Remove, sprinkle on desired amount of cheese (more is better obviously) and green onions if you choose. Put back in the oven for 5 more minutes or until the cheese is melty
8. Let it rest for 5 minutes before serving, it will be really hot
9. Garnish with sour cream, avocado or any of your other favorite toppings
*if you don’t have a large enough cast iron skillet, simply prepare the mixture in a regular skillet and then put it in a greased 9×13 baking dish

Banh Mi (Vietnamese Sandwiches)

We have no shortage of good banh mi around my office, but I wanted to try to re-create one of these delicious little sandwiches myself. A year or so ago, I found and amazing recipe for Thit Nuong (Vietnamese grilled pork) from gastronomyblog.com. I adapted it a bit, using pork tenderloin instead of pork butt and eliminated a few of the ingredients but realized it would be great for a banh mi filling. I was right 🙂 This meat can also be served over rice noodles with additional accompaniments (this was how it was used in the original blog post I found).
*please note, this is not an authentic banh mi recipe, just one I adapted to my taste buds. 

Grilled Pork Banh Mi (serves 4-6)

Ingredients

For the meat:

2 lbs pork tenderloin, thinly sliced approximately 1/4 inch thick
1 large shallot, finely minced
3 cloves garlic, finely minced
1/4 cup lemongrass, finely minced
1 1/2 tablespoons sugar
1/2 tablespoon salt
1 teaspoon black pepper
1 tablespoon honey
1 1/2 tablespoons soy sauce
1/2 tablespoon sesame oil
1 teaspoon vegetable oil

For the mayo:

1/2 cup low-fat mayo
2 tablespoons sriracha (or to taste)

Accompaniments:

4-6 crusty bread rolls
cilantro
mint
basil
julienned carrots
julienned diakon
julienned cucumbers
sliced jalapenos

Directions:

1. Combine all meat ingredients from shallot through vegetable oil in a large non reactive bowl
2. Place pork in marinade mixture, coat well
3. Allow the meat to soak overnight (or for best results, 24 hours)
4. Thread pork onto bamboo skewers that have been soaked in water for 20 minutes
5. Bbq pork over medium high heat until caramelized and cooked through (about 3-5 minutes per side)
6. While the meat is cooking, heat rolls in a slightly warmed oven, about 200 degrees.
7. Remove pork from skewers and place in a large serving dish
8. Slice the rolls and spread about 1 1/2 Tablespoons of the mayo on each roll
9. Add meat, and any of the accompaniments above

Herb and Balsamic Sauced Chicken

Well I’m back from vacation and all though it was a wonderful time of eating, drinking and hanging out with friends and family, I was VERY ready to be home. I was practically melting in Texas, I don’t know how people live there full time! I’ve been craving a home cooked meal that wasn’t 1. BBQ 2. Tex-mex (all though I think I’m ready to eat tacos again) or 3. red meat. This week has been a lot of salads and lighter meals, including last nights dinner. I adapted this recipe from one I found in a Bon Appetite several years ago (original recipe) and has become a favorite when I wanted something light yet flavorful. The sauce is really versatile and can be used on anything from fish to steak to potatoes as well! I served the chicken with roasted asparagus and oven roasted potatoes.

Herb and Balsamic Sauced Chicken (adapted from Bon Appetite, serves 4)

Ingredients:
12 garlic cloves, peeled, divided
1 1/2 cups (packed) fresh flat leaf parsley
1/2 cup balsamic vinegar
1/4 cup (packed) fresh mint leaves
1/4 cup (packed) fresh basil leaves
1 teaspoon dried oregano
1/4 teaspoon dried crushed red pepper
3/4 cup olive oil
4 boneless chicken breasts (I cut mine in half to make them thinner)

Directions:
1. Cook 8 garlic cloves in boiling water 2 minutes, drain garlic and cool
2. Add the remaining 4 garlic cloves and next 6 ingredients
3. Gradually add oil, blending until thick sauce forms and season with salt
4. Place chicken in large resealable plastic bag and add 2/3 cup sauce and turn to coat evenly
5. Chill at least 1/2 hour and up to 4 hours, turning bag occasionally
6. Heat outdoor grill to medium/high heat and grill each chicken breast half about 4 minutes on each side
7. Top with a bit more sauce before serving and pass additional sauce for anyone that wants more (it was great on the sides* I served it with too)


*I suggest serving this dish with asparagus and roasted potatoes, as the sauce accompanies both side very well!

Pizza Party

I have never made pizza dough from scratch, but seeing the cover of the March issue of Bon Appetite had me wanting to try. The recipe is pretty simple and I didn’t change a thing for fear of messing it up. It’s no knead, and requires only 4 ingredients. The only downside is it does take time to rise (about 18 hours) but it’s easy to do the night before and you’re dough will be ready just in time for dinner!

Below you will find the recipe and step by step instructions for the dough followed by the pizzas that I made. Have fun and be creative with your toppings! (Note: this recipe makes enough for 6 10′-12′ pizzas – I only made 4 pizzas and discarded the leftover dough.)

No-Knead Pizza Dough (From the March issue of Bon Appetite, recipe by Jim Lahey)

Ingredients:
7 1/2 cups all-purpose flour plus more for shaping dough
4 teaspoons fine sea salt
1/2 teaspoon active dry yeast
3 cups water

Directions:

For the Dough:
1. Whisk flour, salt, and yeast in a medium bowl. While stirring with a wooden spoon, gradually add 3 cups water; stir until well incorporated.
2. Mix dough gently with your hands to bring it together and form into a rough ball. Transfer to a large clean bowl.
3. Cover with plastic wrap and let dough rise at room temperature (about 72°) in a draft-free area until surface is covered with tiny bubbles and dough has more than doubled in size, about 18 hours (time will vary depending on the temperature in the room). *I am ashamed to admit this, but I actually put my dough next to our heater (turned to 67 degrees). I started it on the floor and then moved it to a chair about a foot from the actual heater.
4. Transfer dough to a floured work surface. Gently shape into a rough rectangle. Divide into 6 equal portions.
5. Working with 1 portion at a time, gather 4 corners to center to create 4 folds.
 6. Turn seam side down and mold gently into a ball. Dust dough with flour; set aside on work surface or a floured baking sheet.
7. Repeat with remaining portions.
8. Let dough rest, covered with plastic wrap or a damp kitchen towel, until soft and pliable, about 1 hour.
DO AHEAD: Can be made 3 days ahead. Wrap each dough ball separately in plastic wrap and chill. Unwrap and let rest at room temperature on a lightly floured work surface, covered with plastic wrap, for 2–3 hours before shaping.

For the Pizzas:
1. Arrange a rack in middle of oven and preheat to its hottest setting, 500°–550°.
2. Working with 1 dough ball at a time, dust dough generously with flour and place on a floured work surface. Gently shape dough into a 10″–12″ disk.
3. Arrange dough disk on baking sheet; top with desired toppings. Bake pizza until bottom of crust is crisp and top is blistered, about 10 minutes.
4. Transfer to a work surface to slice. Repeat with remaining pizzas.

We made 4 pizzas that night – the only one not pictured below was the Hawaiian. My best advice to anyone making more than one pizza is to prep the ingredients ahead of time (oh and have a glass of wine handy), it will save you time and a headache!

Pizza #1 – Margarita
Handful of basil leaves, whole
Sauce (I used blended crushed Italian tomatoes)
Fresh mozzarella
Pizza #2 – Prosciutto
8-10 Slices prosciutto, sliced
3 oz. crumbled goat cheese
3 oz. fresh mozzarella
3/4 cup caramelized onions
Sauce (again I used blended crushed tomatoes)
Pizza #3 – Sausage and Red Pepper
1/3 lb. Italian chicken sausage
6 oz. goat cheese
1/2 cup peppadew peppers
Sauce (again I used blended crushed tomatoes)


Chicken, Asparagus and Goat Cheese Pasta

Asparagus is starting to pop up in grocery stores and fruit stands now and I couldn’t be more excited. I bought a bundle last week without even having a clear intention for them, so I set out to find a good recipe. I wanted something new and different and I wanted to make a main dish with the asparagus, not just put on the side like I usually do.

I stumbled upon an asparagus-goat cheese pasta recipe from Real Simple which looked absolutely to die for.  I wasn’t in the mood to be a vegetarian, so I decided to add some chicken to the original recipe. I also changed the amounts of some of the ingredients, but tried to keep true to the spring time flavors of this lovely pasta!

Chicken, Asparagus and Goat Cheese Pasta Adapted from Real Simple (Serves 6, WW Points+ 11 points/serving)

Ingredients:
1 11/4 pounds chicken breast
1 pound asparagus
1/2 pound dry whole wheat spaghetti
1 tablespoon unsalted butter
1 tablespoons all-purpose flour
1 3/4 cup chicken broth
4 ounces goat cheese
1 teaspoon lemon zest
1/2 cup grated Parmesan cheese
salt
freshly ground black pepper

Directions:
1. Heat a large pan of lightly salted water to boiling over high heat. Trim the ends of the asparagus and cut the stalks into 2-inch pieces.
2. Blanch the asparagus in the boiling water for 2 minutes. Remove with a slotted spoon and rinse under cold water to stop the cooking.
3. Heat a grill to medium high heat. Season chicken generously with salt and pepper. Grill the chicken about 4 minutes on each side, or until done. Slice into strips, cover.
4. Add the spaghetti to the boiling water and cook until al dente. Drain.
5. Meanwhile, in a saucepan over medium-high heat, melt the butter. Whisk in the flour.
6. Add the broth and cook for 2 minutes, stirring constantly (make sure to stir constantly!), until the sauce thickens. Blend in the goat cheese and lemon zest.
7. Toss the spaghetti with the chicken, asparagus, sauce, and half the Parmesan. Serve with pepper to taste and the remaining Parmesan.